Using the tables feature in Eggplant Functional for keyword-driven testing can be a good choice for either manual or automated testing, particularly for larger organizations or in environments where you might want to separate the testing process and test development. This article explains what keyword-driven testing is and how you can use the tables feature to implement it in Eggplant Functional.
What Is Keyword-Driven Testing?
Keyword-driven testing is a testing framework that lets you develop functional test scripts separately from the creation of test cases or workflow. You employ keywords or action words, which represent a particular functionality being tested, in an external data table along with arguments for each keyword (the data). This approach is also known as scriptless testing, since you don't need to write scripts to parameterize test cases. This process is similar to data-driven testing, but rather than feeding in pure data, keywords and the corresponding data are fed into the test execution driver together.
In Eggplant Functional, you can implement keyword-driven testing with the tables feature. You access and build tables in the Suite window. Your scripts become selectable actions in the table, and users can run the table to see pass/fail results for each step. Here's a quick video demonstration of tables in Eggplant Functional:

User Roles in Keyword-Driven Testing
In this process, the workflow can be divided between the "back end" development and the "front end" execution of your tests. Your framework developers, or test engineers, will generally be creating the scripts to the specifications of the actions or keywords necessary for testing. Your test analysts, or testers, will build the test workflow in the table and execute tests; because this role doesn't require a high technical proficiency, in some organizations, it could be assigned to someone such as a business analyst.
It's important that test engineers and testers work together throughout the development process. Depending on the size of your environment, both roles could be filled by the same person. In such a case, you might still find it useful to develop a testing model based on tables because of the flexibility that tables provide.
Step by Step: Creating a Keyword-Driven Test with Tables
When testing an application, you might find many standalone activities representing some type of functionality of the application. For instance, if you were testing a retail website, you might have tasks such as Navigate_To_Website, Register, Search, Add_To_Basket, and so forth. If you develop the scripts so that all functions can be executed independently of the others, then many, many test cases can be created using tables.
- Identify the discrete, individual tasks that the test can be broken into.
At this stage, test engineers and testers are likely brainstorming together. The object is to identify each individual action in the test process. For example, in the above retail website example, we've already got a list started. To make things simpler, let's say you have a test where you need to navigate to a website, perform a search, verify that the searched item was found, then close the browser to return the system under test (SUT) to its original state. Your tasks might be:
- Launch_Browser
- Navigate_to_Website
- Perform_Search
- Verify_Search
- Close_Browser
- Create a script for each task.
For the website search example, the test engineer would create five scripts in the Scripts pane; this process is no different from creating any other script. (For information about creating scripts, see The Script Editor.) Name the scripts with descriptive action words—your keywords—as in the list above. Note that you still need to write the actual scripts to perform the actions, but for now we're only concerned with creating and naming the actions we want to execute as part of a table.
If you want a script to be available as an action in a table, you set it to either Execute or Verify on the Table Action pane under Info. With a script selected in the Scripts pane, click the Info button to reveal the Table Action pane:

The Table Action pane in the Script Editor, where you set scripts as table actions.
- Select Execute from the drop-down list for scripts that don't have results you want to verify.
- Select Verify from the drop-down list if the script will return a result that you want to verity.
Note: With the default choice Not a Table Action selected, the rest of the options in the Table Action pane are not visible.Note: From the Table Action pane, the test engineer can pass default arguments for both Execute and Verify scripts and default expected values for Verify scripts. However, the tester can override these values by changing them in the table itself. - Build your test case in the table.
After the test engineer has defined the scripts/tasks as table actions, the tester can build the test by following these steps:
- Right-click in the Tables pane and select New Table. Give your table an appropriate name, and hit Enter. The table opens in a new tab in the main body of the Suite window.
- Select the actions you want to execute in your test.
A new table consists of one blank row. You can select actions from the drop-down list in the Action column. Any scripts that the test engineer has assigned as table actions are available at the bottom of this list.
When you select an action, the row is assigned a step number and a new blank row is created. If the test engineer assigned any default arguments or expected values, that information appears in the table in the appropriate columns; otherwise, you'll need to fill in that information if it's required.
- For each step, decide whether you need a script or can use a pre-defined action.
In addition to any scripts you've defined as table actions, the Action drop-down list includes many common Eggplant Functional commands and functions. Because you've broken the testing process into small, discrete units, in some cases you might want to use a built-in action rather than writing a script to accomplish the same function. This part of the process requires close communication between testers and test engineers.
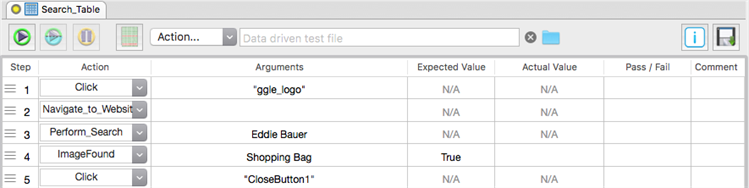
For instance, here is the table with the five actions, as scripts, inserted:
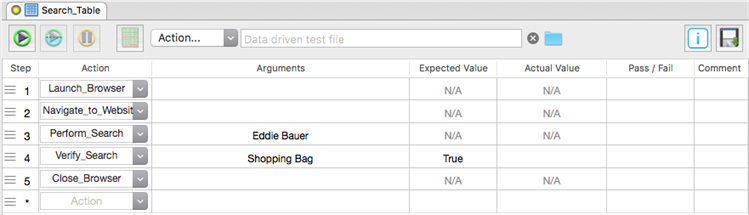
For the first step, Launch_Browser, you might write a script that clicks (or double-clicks) an image to launch your intended browser. However, you can achieve the same result by choosing Click (or DoubleClick) from the Action drop-down list, then selecting the appropriate image as the argument for that step.
When you choose any image-based command or function from the Action drop-down list, the Arguments column for that step provides you with a drop-down list of all the images from the current suite.
Note: If you're not writing a script to execute the action, you still need to capture the image in the SUT so that it is available to select as an argument.For the current example, three of the steps could be executed with built-in actions: clicking an image to open the browser, clicking an image to close the browser, and using the ImageFound() function to verify the search:
- Create your scripts.
At this point, you have a clear picture of which actions still need to be scripted. The test engineer can use all of the normal scripting tools in Eggplant Functional to create the code for your scripts.

Executing a Test from a Table
With the script development complete and your testing scenario built in the table, the tester is nearly ready to execute the test. However, you still need to ensure that your arguments and expected values for each action item are assigned correctly.
If the test engineer included default information in the script's Table Action pane, it appears in the table automatically when the tester selects the script as an action. Remember you can override default information if you want to run the test with different values. Also, if the script definition sends placeholder text to the table, you'll need to replace the placeholder with actual values. In either case, you select the current value in the table and replace it with the value you want to use.
For any step that you want to verify, you'll need to have a value in the Expected Value column and the script or action itself has to return a value (the Actual Value, which is filled in after you run the table). These two values (Expected and Actual) are compared to determine the Pass/Fail result.
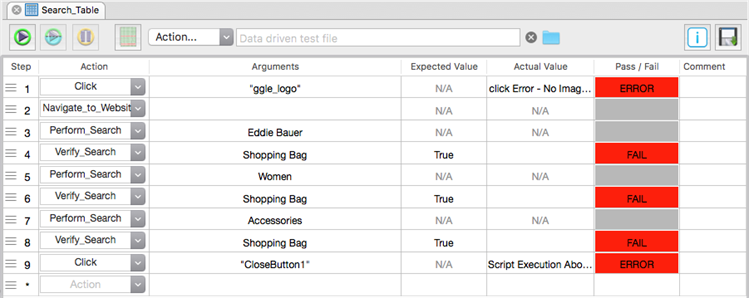
You should now be ready to run your table to execute tests. When you click the Run button, Eggplant Functional executes the action of each row of the table, in order. Regardless of whether an individual row passes or fails, the table continues through each step in the table.
The Pass/Fail column shows you what happens with each line:
- Green: Pass
- Red: Fail or Error
- Gray: The action on the row completed successfully but did not require pass/fail validation
- Yellow: Running (the action is in progress)
Extending the Test Model
You can choose a script as an action multiple times in the same table, just as you can for pre-defined actions. In the example above, the Perform_Search script is written so that it takes its search term from whatever argument you enter in the table. The Verify_Search script passes a specific argument so that it always validates against the same thing.
By repeating these two scripts in a table and using a different argument for Perform_Search each time, you can quickly run through a list of test items:
![]() Eggplantsoftware.com | Documentation Home | User Forums | Support | Copyright © 2022 Eggplant
Eggplantsoftware.com | Documentation Home | User Forums | Support | Copyright © 2022 Eggplant